This Instructor Guide provides an overview on UW Zoom Sign-In, Account Settings, Scheduling Meetings, In-Meeting Features, and Sharing Recordings.
SIGN IN TO UW ZOOM
It is essential to use your UW Zoom Account for the Zoom app in Canvas and Panopto-Zoom Integrations to work.
We recommend scheduling all Zoom meetings, and opening your course Zoom meetings in your Canvas course. Sign in to your course, and open the Zoom tab in navigation to see the Zoom schedule and interface.
You can also sign in to UW Zoom using the Zoom application, and your web browser.
NOTE: If you were previously signed into a non-UW Zoom account (for instance, your personal email), make sure to completely sign out of Zoom and quit your browser.
CUSTOMIZE ACCOUNT SETTINGS
Zoom allows you to customize your account settings and features based on your preferences. We recommend going through these options before you begin regularly hosting meetings, and then reviewing them after you’ve hosted a few meetings to make adjustments.
Zoom Security Settings
Please follow UW-IT’s recommended Security Best-Practices to ensure a safe and welcoming online learning environment.
UW-IT Guide: Security Tips and Best Practices
Zoom Profile Settings
To customize your Zoom Profile Settings:
- Go to https://washington.zoom.us/profile/setting and sign in with your personal UW NetID and password.
- Across the top of the window are links for Meeting Settings and Recording Settings. This is where you are able to turn on/off specific Zoom features (e.g. chat, polls, annotations, etc.)
- Meeting Settings:
- Mute participants upon entry: ON
- Auto saving chats: ON
- Nonverbal feedback: ON
- Recording Settings:
- Cloud recording: ON
- Record active speaker with shared screen: ON
- Audio transcript: ON
- Save panelist chat to the recording : ON
- Automatic recording: Your choice
- NOTE: if you have Join Before Host enabled, a recording is created any time anyone joins the room.
- Meeting Settings:
Zoom Guide: Changing Settings in the Desktop Client or Mobile App
SCHEDULE ZOOM MEETINGS
Schedule and start meetings from the Zoom app in Canvas. Course Zoom meetings must be scheduled from the Zoom app in Canvas for the Panopto Zoom Integration to work.
UW-IT Guide: Zoom app in Canvas
Video Demo: Schedule Zoom Sessions from Canvas
BASIC IN-MEETING FEATURES
Audio and Video
After starting your Zoom meeting, you need to join the room’s audio. Zoom allows audio participation either by using computer audio (internal speakers or a headset) or by phone. Joining the room’s audio is necessary to be able to listen and participate in the meeting. Optional, but highly recommended, is to enable your webcam.
During the meeting, you can mute your microphone or stop your video at any time.
- To use your computer audio, click the button Join with Computer Audio.
- You also have the option to Test Computer Mic & Speakers before joining the meeting audio.
- To join by phone instead, call in to the phone number provided and enter the Meeting ID and Participant ID when prompted.
- To mute your audio, click the microphone icon in the bottom-left corner.
- The icon changes to display a red diagonal slash through it.
- To unmute, click the microphone icon again. Follow the same process to adjust the webcam.
NOTE: If you are teaching in one of PCE’s enhanced audio classrooms, the directional ceiling microphones available in the room will provide the audio input to Zoom.
Video Demo: Look and Sound Good in Zoom
Host Meeting Controls
Everyone entering a Zoom meeting is able to view the Meeting Controls menu at the bottom of their screen (appropriate to their role in the room).
![]() On the left hand side of the screen are the Audio and Video controls, both of which have drop-down menus of options that are associated with the Audio and Video application settings.
On the left hand side of the screen are the Audio and Video controls, both of which have drop-down menus of options that are associated with the Audio and Video application settings.
- Mute/Unmute: This allows you to mute and unmute your own microphone.
- Audio Controls (via the ^ arrow next to mute/unmute): The audio controls allow you to change the microphone and speaker that Zoom is using on your computer, to leave computer audio, and to access the full audio options in the Zoom Application settings.
- Start/Stop Video: This allows you to start and stop your own video.
- Video Controls (via the ^ arrow next to Start/Stop Video): If you have multiple cameras on your computer, you can select which Zoom is using, access the full video controls, and select a Virtual Background.
- Security: This allows you to instantly turn on/off Participant settings during a meeting

- Participants: This opens up the Participants window allowing you to view the names of Participants, view their Non-Verbal feedback, and manage their microphones and other elements.
- Zoom Guide: Managing Participants In A Meeting
- Polls: This provides access to creating, editing, and launching polls. The options to create or launch polls open up the Zoom web portal in your default browser. We recommend creating polls in advance.
- Zoom Guide: Polling For Meetings
- Chat: Opens the chat window to view posted messages and send messages to Everyone or to a specific Participant. This icon changes color and displays a count when there are unread messages.
NOTE: You can only view messages posted after you signed in to the room.- Zoom Guide: In-Meeting Chat
- Share Screen: This button allows you to start sharing a screen, application, whiteboard or other content.
- Zoom Guide: How Do I Share My Screen?
- Record: Start or stop a cloud or local recording. While Participants can view this option, the Host needs to approve requests from anyone else to record the meeting.
- Zoom Guide: Cloud Recording
- Live Transcript: If you have enabled closed captioning for your account, your students can turn on closed captions.
- Zoom Guide: Getting Started With Closed Captioning
- Breakout Rooms: Brings up a dialog where you can configure and start breakout rooms.
- Zoom Guide: Getting Started With Breakout Rooms
- Reactions: Allows any Participant to add icons (like emoji’s or thumbs up) to the corner of their video window for 5 seconds.
- Zoom Guide: Meeting Reactions
- End: On the far right hand side of the tool bar is the option to End Meeting (all other Participants have a button that says “Leave Meeting”). Clicking this brings up a dialog box to end the meeting for all participants. If you would like for the meeting to continue after you leave, you must assign the Host role to another Participant before you leave.
NOTE: If your screen cannot display all the enabled options, it may instead display a More… icon. Clicking on this will give you access to any hidden options.
Managing Participants
The Participants window provides the meeting Host with options to manage participants. Thus, the control that opens this window is labeled Manage Participants in the Meeting Control menu.
Within meetings, the Host can control the following:
- Mute participants, individually or as a group
- Request that a participant unmute their microphone
- Stop a participant’s video
- Request that a participant start their video
- Prevent Participants from screen sharing
- Rename a Participant
- Give a participant the ability to record locally
- Make a participant the Host (removing yourself from this role) or co-host
- Choose to play an enter or exit chime
- Lock the meeting to prevent anyone new from joining
- Have participants enter the waiting room (if enabled in the meeting room’s settings)
Zoom Guide: Managing Participants in a Meeting
Share Screen
One of the most commonly used features of Zoom is Share Screen, which allows you to present content such as demonstrating how to do tasks, walking through a specific computer program, sharing a PowerPoint deck, playing videos, or collaborating via a whiteboard.
Once you click the Share Screen icon on the Meeting Controls menu, the Share Screen popup opens to the Basic tab allowing you to select what you would like to share.
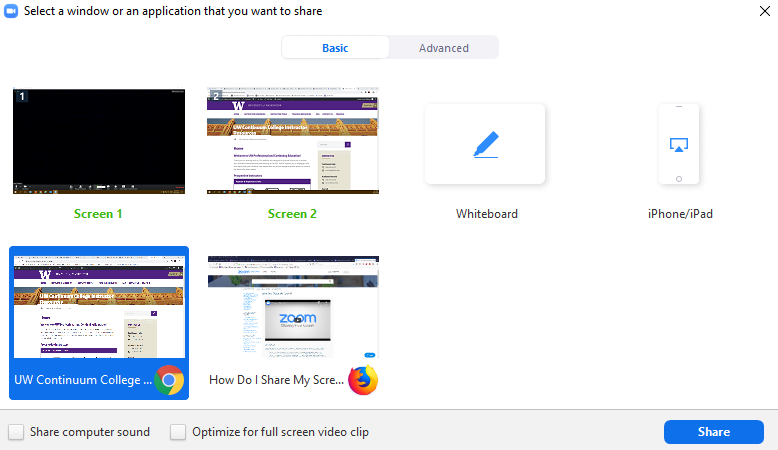
Your options include:
- Your entire desktop screen
- If you have multiple monitors, you need to select which screen you want to share.
- A whiteboard
- An individual application window
- Whether you wish to Share computer sound
- If you are sharing a video or audio clip (such as a YouTube video) as part of your Share Screen, this ensures that participants are able to hear the audio.
- Whether you wish to Optimize for full-screen video clip
- If you are sharing a video clip, we recommend checking this option. Checking this option also checks the Share computer sound option.
Once you select your preference, click on the blue Share button in the bottom right of the popup. A window with the option you selected will go to full screen, and participants can view the shared content along with your cursor.
Share Screen Menu
When you use Share Screen, your Meeting Controls menu moves from the bottom of the screen to the top, its visible options change, and you can now move it around the screen as is useful. The options for Video, Manage Participants, and Polls remain in roughly the same place with other controls moving to the …More icon on the far right end of the menu. The Share Screen icon changes to New Share and the Share-specific options of Pause Share and Annotate are added just to its right.

- New Share: Brings up the Share Screen popup window so you can select what you want to share next.
NOTE: This does replace the current share, as you can only share one screen at a time. - Pause Share: Pauses your current share and not show any updates to your shared screen/application/etc. until you choose Resume Share.
- Annotate/Whiteboard: Launches the annotation tools so you can write and draw on your shared screen.
- …More: Opens a drop-down menu containing the options for Invite, Chat, Record, Closed Caption,Breakout Rooms, and End Meeting, as well as these new options:
- Disable/Enable Attendee Annotation: Allows you to control whether Participants can launch their own annotation tools and annotate on your Share.
- Hide Video Panel: When sharing, the meeting video becomes a movable window. Use this to hide the video panel.
- Hide Floating Meeting Controls: this hides the sharing controls at the top of the screen, with the Meeting ID and Stop Share still visible. Hovering over the green meeting ID bar displays the controls.
- Share computer sound: If you want to share audio or video content (such as a YouTube clip), make sure this is selected so that Participants hear the audio playing on your computer.
- Optimize for full-screen video clip: If you share a video clip (not your live camera feed), we recommend checking this option.
Best Practices
- Select only the specific application or browser window which you wish to share, to reduce distractions and ensure that you only share relevant information with students.
- When sharing a PowerPoint presentation, start your slideshow first, and then start your Share Screen. From there, you can choose to only share the slideshow view, and not the main PowerPoint application.
Zoom Guide: Host Controls in a Meeting
Zoom Guide: Participant Controls in a Meeting
Zoom Guide: How Do I Share My Screen?
Ending your Meeting
When your meeting is over, click End Meeting in the lower right corner of the meeting control menu, or under the …More section of the Share Screen menu. This opens a pop up menu asking whether you want to end the meeting, leave the meeting, or cancel.
Select the End Meeting for All button to ensure that the meeting is properly ended and, if you are recording to the cloud, that the recording begins processing.
ENGAGING IN-MEETING FEATURES
Reactions and Non-Verbal Feedback Icons
Students can select Reactions in the Zoom Meeting menu bar (add emoji’s to the corner of their video window), and add non-verbal feedback icons from the participants list (including raising their hand, yes/no, and making requests to the meeting host).
Use the non-verbal feedback icons to ask for quick and simple feedback. This minimizes noise/feedback from participant microphones and can be clearer than a cluttered series of short messages in the chat. For example, “Do you need more time?” or “Give me a Thumbs Up Reaction if you are ready to move on.”
Chat
The in-meeting chat allows you to send chat messages to other users within a meeting. Chat is supported on desktop and mobile, and remains available even while sharing your screen. When a new chat message is sent to everyone in the meeting room, or privately to you, a preview of the message briefly appears and the Chat icon flashes orange within the meeting control menu with a number indicating how many new messages are available.
Some additional features of Chat:
- Messages can be sent either to all participants or privately to an individual participant.
- As the Host, you can choose who the participants can chat with, or to disable chat entirely.
- Chat is supported on desktop, mobile, and is still available even while sharing your screen.
- When sharing your screen, the chat option moves to the drop-down menu in …More on the Share Screen menu.
- When sharing your screen, the Chat appears as a floating window, as opposed to part of the side menu.
- Files can be sent via the Chat feature.
- In-meeting chat can be saved, manually or automatically.
- Auto-save chat automatically saves your in-meeting chat locally on your computer. You can also manually save your chat when you start local or cloud recording.
Under the More icon of the Chat window, you can edit your in-meeting chat settings. You can access the following options:
- Save chat: Save all chat messages in a TXT file.
- Share file in meeting: Send a file in the chat.
- Allow attendees to chat with: Control who participants can chat with.
- No one: Disables in meeting chat.
- Host only: Only the host can send messages to everyone. Participants can still send private messages to the host.
- Everyone publicly: Participants can only send
public messages. Public messages are visible to all participants.
Participants can still send private messages to the host. - Everyone publicly and privately: Participants can
send public or private messages. Public messages are visible to all
participants. Private messages are sent to a specific participant.
Zoom Guide: In Meeting Chat
Best Practices
- Allow students to chat with everyone publicly. If one student has a question, it is likely that another one has the same question. Additionally, students feel more connected to their course if they are able to engage with their peers.
- Encourage students to use the Chat feature to ask questions and answer them for one another, or for you to answer when you reach a natural stopping point in the lecture.
- Avoid using the chat for long responses or long explanations.
Breakout Rooms
Student engagement can decline when students are in larger groups, and students may feel less able to be heard. Shy students may also feel more intimidated to speak up. You can use small groups to increase participation, allow students to feel more heard, and encourage everyone to share their thoughts. Small groups should ideally be no more than 7 people. 2-5 is excellent, but you can go a bit larger depending on the activity.
Zoom has a built-in tool for small groups, known as Breakout Rooms.
- Up to 50 breakout rooms can be created
- Breakout room participants have full audio, video, and Share Screen capabilities
- If a meeting is being recorded, no breakout room activity is included
- Participants can be moved after they’ve been assigned to a room
- Breakout rooms can be recreated, allowing students to participate in the same discussion groups throughout the session
- You can broadcast a message to all breakout rooms
- “There are ___ minutes left for small group discussion”
- “Please wrap up your conversations”
- Provide additional insight, prompts, or questions
- Participants of a breakout room can ask for help to invite the host into their room
Zoom Guide: Getting Started with Breakout Rooms
Zoom Guide: Managing Video Breakout Rooms
RECORDING & SHARING MEETINGS
When you record a meeting and choose Record to the Cloud, the video, audio, and chat text are recorded in the Zoom Cloud. Zoom Cloud recordings are automatically deleted 90 days after they were recorded, so migrating recordings to Panopto will allow students to access recordings beyond the Zoom cloud 90-day retention period.
NOTE: We recommend enabling your Panopto-Zoom Integration so your Zoom Cloud recordings will automatically be migrated to your Panopto course folder, and be retained for 5 years.
Starting a Cloud Recording
When scheduling your Zoom meetings, you can turn on the meeting option “Record the meeting automatically > In the cloud” so Zoom will automatically start recording at the start of your meeting. This will ensure that you do not forget to start the recording.
If you do not have the “Record the meeting automatically” setting turned on, you can start a cloud recording during the meeting from the Zoom meeting controls menu bar:
- From the Zoom meeting controls menu bar, click on the Record button.
- If you are sharing your screen, this option moves to the … More menu.
- Select Record to the Cloud to begin recording.
- A recording icon in the top corner of the screen indicates the meeting is being recorded, and a voice announces to all meeting attendees, “This meeting is being recorded.”
NOTE: Participants who join the meeting later hear this announcement when they enter.
- During breaks, we recommend that you Pause the Recording.
- To stop recording completely, click Stop Recording, or End Meeting.
- Once you End Meeting, the recording begins processing on the Cloud.
- Recordings generally take less than an hour to complete processing. However, actual processing time depends on complexity of meeting interaction—the number of web camera inputs, desktop sharing, and sharing video increase processing time, as well as the recording file size.
NOTE: Once the meeting has ended, the recording must be processed before viewing. If you have the option enabled, Zoom sends an e-mail to the meeting owner when the process is complete.
Panopto
Uploading recordings to Panopto is recommended, since Panopto provides the most options for managing your recordings and does not count against file storage limits in your Canvas course. Panopto is a UW supported lecture capture service, and is available to all instructors through their UW NetID and Canvas course. Panopto automatically creates folders for courses within Canvas, and grants students viewer level access to videos within those folders. Because Panopto is integrated with Canvas, videos are automatically protected behind UW NetID authentication, and course affiliation.
- Videos can be embedded within a Canvas page.
- Videos can be shared via a hyperlink within a page or as an external URL within Canvas modules.
- The full directory of videos can be accessed from the Canvas course navigation, via the Panopto Recordings tab.
Note: Embedded Panopto videos are only available to the students of the current academic term. Panopto videos which you wish to reuse must be manually copied over to future terms, and embedded videos must be updated to reflect the new location. However, sharing course recordings which contain student interactions from prior academic terms with future students is a FERPA violation.
UW-IT Guide: Panopto Lecture Capture
Panopto Zoom Integration
Setting up the Panopto Zoom Integration moves Zoom recordings automatically to your course folder in Panopto.
For the Panopto Zoom Integration to work, three elements are essential:
- First the meeting creator must enable the automatic import option in their Panopto account per the instructions UW-IT provided.
- The Zoom meetings must be scheduled using the Zoom app in Canvas.
- The Panopto Recordings tab must be visible in the Canvas Course Navigation Menu to allow students to access the recordings (Enabling Panopto Recordings in Course Navigation instructions listed below).
- As a Best Practice, we recommend that all instructional team members enable the automatic import option on their account as well.
Enabling Panopto Recordings in Canvas Course Navigation Menu
Enable the Panopto Recordings tab in your course navigation menu, so it is visible for your Canvas course and accessible to your students.
- If Panopto Recordings is not currently in your course navigation menu, you may need to enable the menu item. Click on Settings at the bottom of your course navigation menu.
- Click on the tab labeled Navigation across the top of the page.
- Locate the tab for Panopto Recordings and drag it to where you wish it to appear in the course navigation menu, or click on the three vertical dots next to the tab and select Enable.
- Click on the blue Save button.
- Refresh your page, and the Panopto Recordings tab will now appear within your Canvas course navigation.
Manually Uploading Recordings to your Panopto course folder
Video Demo: Manually Migrating Zoom Recordings to Panopto
UW-IT Instructions: Upload Zoom recordings to Panopto
Embedding a Panopto Video to a Canvas Page

Panopto videos can be embedded within Canvas pages using the Rich Content Editor.
- When editing a page, select the Panopto Recordings button (green triangle icon).
- Select the Panopto video from your course folder you wish to embed.
- Click Insert
- The Panopto video should now be added to the Canvas page.
- Save the Canvas page to apply the changes.
UW-IT Guide: Add a Panopto Recording to a Canvas Page
Manually Uploading Caption Files to Panopto (.VTT file)
Video Demo: Uploading Caption Files to Panopto
- In your Panopto folder, locate the video that you want to upload captions to.
- Hover your mouse over the video then click on Settings.
- In the Settings window click the Captions tab in the left navigation bar.
- In the Captions tab, first check under the Available Captions header to see if the video already has a caption file in the same language.
- Each video can have multiple caption files, but only one for each language.
- If you need to replace an existing caption file, you must delete it before uploading a new file.
- Under the Upload Captions header, check the drop-down list to make sure you have selected the correct language. The default is English (United States)
- Click the Choose File button, then select the file you need. (Panopto supports four caption file formats: .srt, .vtt, .ashx, and .dxfp)
- Click the Upload Captions button. The caption file should upload in seconds.
Panopto will embed the caption file with your video, typically within a few minutes. Longer videos will need more time.
Updated 09/22/22